How To Make YouTube Channel Private in the Easy Way
William Davis | Updated on 2025-10-11
Feeling like your digital creations need a little breathing room? You’ve got a YouTube channel, but maybe you're prepping a major launch, or perhaps you just uploaded a super-awkward video you’re not ready to share with the world yet. You need to know how to make YouTube channel private, and you need the steps right now. Seriously, locking down your content is easier than ordering pizza. It’s all about drawing that privacy line. Ready to get total control over your visibility? Let's figure this out together.
Contents
Why You Absolutely Need to Make Your YouTube Channel Private
Look, sometimes you're just not ready. Period. Maybe you're fine-tuning a brand new channel design, or perhaps the content is strictly for a select group—like a client presentation or internal team training. This is why knowing how to make your YouTube channel private is a creator superpower. Think of the difference between Private and Unlisted. Unlisted is like an unlocked back door; anyone with the URL can sneak in. Private? That’s a digital vault. Only you and the few people you specifically invite can view anything. When security and control are your top priorities, making YouTube channel private is the only smart move. Don't risk premature sharing!
The Core Difference: Channel Private vs. Video Private
Let’s clear this up: when people ask how to make YouTube channel private, they really mean setting all their current videos to private. YouTube doesn’t have a single "Channel Off" switch. The channel page remains, but appears empty and locked. But if you have a public channel and only want to hide a specific project—say, a client draft—you only need to worry about making an individual video private. You maintain your public presence while keeping certain content completely hidden. Flexibility is key!
Desktop Domination: How To Make YouTube Channel Private on PC/Mac
When you want to lock down your entire library, the desktop is your best friend. Why? Because you can bulk-edit everything fast. Get ready to dive into the YouTube Studio.
Accessing the Control Center: YouTube Studio
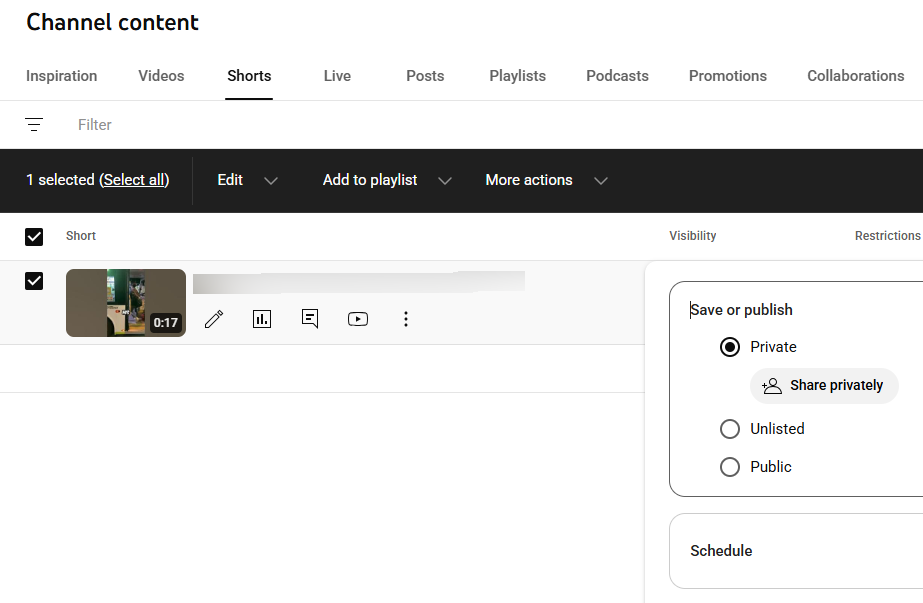
Jump into YouTube, click your profile pic, and hit YouTube Studio. This is where the magic happens. On the left, find the "Content" tab and click it. You’ll see every video you've ever uploaded. If you’re serious about needing to make your YouTube channel private across the board, this is where you start the mass operation.
Bulk Change Magic: Setting Visibility to Private
This is the key step in how to make a YouTube channel private. See the checkbox right at the top, above your video list? Click it to select the whole page. Then, look for the "Edit" button (it usually looks like a pencil or a dropdown). From the options, choose "Visibility." You’ll get the "Public," "Unlisted," and the glorious Private options. Select Private. It’s incredibly satisfying, isn't it? If you have hundreds of videos and need to quickly make your channel content private, this bulk action saves you hours.
Sealing the Deal: The Final Update
Don't forget the last crucial click! After setting everything to Private, you MUST hit the "Update Videos" button. YouTube might give you a quick "Are you sure?" confirmation—just nod (or click 'yes') and finalize the update. Now, go try to visit your channel page when logged out. Empty. Silent. You successfully figured out how to make YouTube channel private and secured your content completely!
Mobile Mastery: Making Your YouTube Channel Private on the Go
Caught in a café and need to hide a clip now? The mobile app is your savior, though it usually handles videos one-by-one—which is fine for a quick fix.
Your Pocket Command: Using the YouTube App
Fire up the app and tap your profile photo. Go to "Your Channel" and then hit "Manage Videos." Now you have your content list in the palm of your hand. If you only need to know how to make a YouTube video private, this is the speediest route. Find the video, tap the three little dots next to its title.
The Quick Switch: Making Individual Videos Private
In the options menu, select "Edit." Scroll down until you see "Visibility." It’s likely set to Public. Tap it, switch it to Private, then remember to save the changes (usually by tapping the checkmark or 'Save' button). That's all it takes! This is the essential hack for making YouTube videos private quickly when you're nowhere near your computer.
Expert Tip: Perfecting Videos Before They Go Private
A seasoned creator knows this: always upload your videos as Private or Unlisted initially! Never straight to Public! This gives you crucial time to double-check metadata, tags, and thumbnails. Smart creators prioritize the quality check before the reveal.
Why Pre-Upload Privacy is Non-Negotiable
Sometimes, the video file itself needs work before it even hits the YouTube server. Maybe video quality needs an upgrade, the format needs converting, or the file size is just too massive. Wasting time uploading a giant, unoptimized file only to have to learn how to make YouTube channel private to hide it is a rookie mistake.
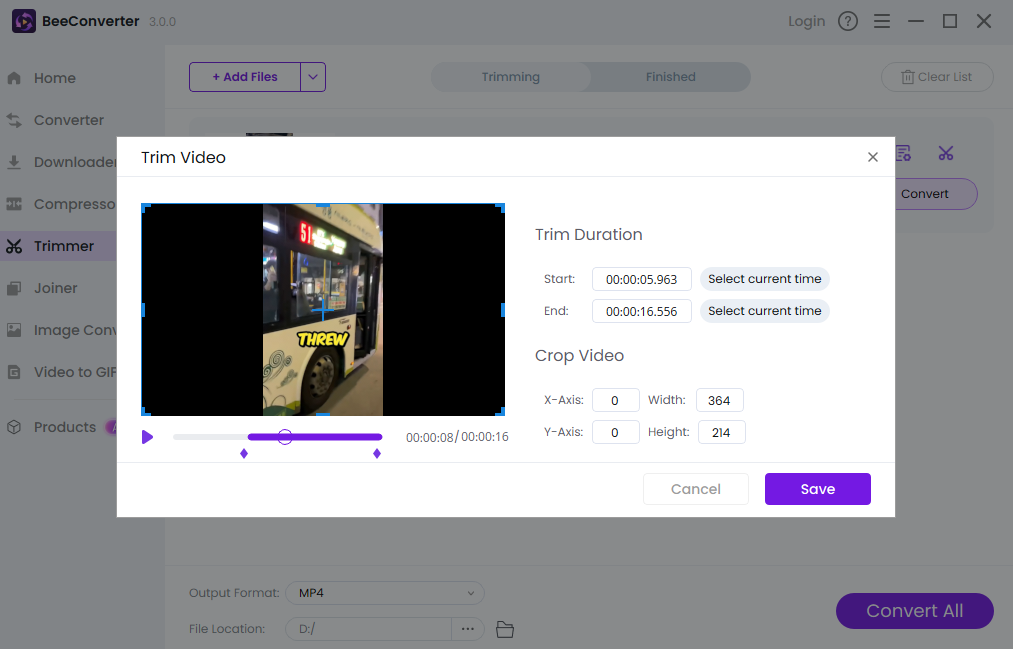
Quality Control Check: Enter BeeConverter
For those essential pre-upload adjustments—like converting files to the optimal format, compressing gigantic videos, or even doing some light trimming—you need a reliable tool. That's where BeeConverter shines. It helps you get your video pristine, optimized, and ready to upload privately. Use the best tools to ensure your video is perfect before you even think about whether to make your YouTube channel private or public.
Conclusion
The total control is totally achievable! Learning how to make YouTube channel private is a foundational skill that gives you peace of mind, time for testing, and ultimate power over your rollout schedule. Whether you’re securing one quick clip on the phone or dropping the digital curtain on your whole desktop library, you now know the path. Take charge of your creations, keep your projects safe from prying eyes, and only share when you’re 100% ready. It’s your creative domain; own that privacy!